Dairy Free Milk ??


Milk alternatives aren’t just for vegans — although the explosion of options beyond just
almond and soy in recent years are an answered prayer for animal-free foodies.
So as you all know by now I am allergic to all things dairy. What a bummer right? Well its not so bad because there are actually ALOT of alternatives out there that are believe it or not.. HEALTHIER. 
I am not saying they are all healthy, just like with everything else I always suggest reading the ingredient label. Ingredients can be organic or genetically modified, natural or heavily processed, the fewer ingredients in the list and the more you recognize and can pronounce, the better. 

Milk (unless you're getting skim) contains cholesterol and skim milk is higher in lactose (sugar) than whole milk. There is no real health option when it comes to choosing dairy-based milk. All plants are free from cholesterol, and the body produces enough on its own so that we don’t need to take in excess cholesterol to maintain good health.

Honestly guys we don't even buy dairy milk anymore. Non-dairy milk works the same for us and we use it the same way you would cow's milk. Cereal, oatmeal, sauces, baking, soups, Shakeology and even ice cream. It taste pretty good on its own if you're a glass of milk in the morning kind of person.


Here is a list of some of the top Milk Alternatives 

Almond
30 calories, 2.5 g fat, 180 mg sodium, 2 g carbs, 0 g sugar, 1 g fiber, 1 g protein, 45% DV calcium (based on Almond Breeze)
Soy
80 calories, 4 g fat, 70 mg sodium, 3 g carbs, 1 g sugar, 2 g fiber, 7 g protein, 30% DV calcium (based on Silk)
Bonus: Soy is the only plant-based milk with protein content similar to dairy milk so it will be great in a post workout shake. 
Cashew
40 calories, 3 g fat, 120 mg sodium, 3 g carbs, 0 g sugar, 0 g fiber, 1 g protein, 30% DV calcium (based on Cashew Dream)
Hemp
80 calories, 8 g fat, 125 mg sodium, 1 g carbs, 0 g sugar, 0 g fiber, 2 g protein, 30% DV calcium (based on Living Harvest)
Flax
25 calories, 2.5 g fat, 80 g sodium, 1 g carbs, 0 g sugar, 0 g fiber, 0 g protein, 30% DV calcium (based on Good Karma)
Bonus:  Hemp and flax milk are rich in omega-3s, so they get bonus points for extra health benefits.
Coconut
45 calories, 4g fat, 0 mg sodium, 2 g carbs, 0 g sugar, 1 g fiber, 0 g protein, 10% DV calcium (based on SO Delicious)
Bonus: Coconut milk is high in fat so it’s a great alternative to cream in your coffee 
Rice
120 calories, 2.5 g fat, 100 mg sodium, 23 g carbs, 1 g sugar, 0 g fiber, 1 g protein, 2% DV calcium (based on Rice Dreams)
Bonus: Rice milk is good for people with both dairy and nut allergies, but keep in mind it’s high in carbohydrates, so pair it with protein-rich foods to keep your blood sugar stable.
Hazelnut
110 calories, 3.5 g fat, 120 g sodium, 19 g carbs, 2 g protein, 1 g fiber, 14 g sugar, 30% DV calcium (based on Pacific)
There are also several flavored non-dairy milks on the market and I would be doing you guys an injustice if I did not tell you about Nutchello <3 

There are 3 varieties, a dark chocolate walnut , toasted coconut+cashew and my favorite 
Caramel Almond+Cashew 
70 calories, 2 g fat, 190 mg sodium, 11 g protein, 0 fiber, 30% DV calcium
I add this into my shakes to switch it up, I also add it to my Ice Cream recipe( below) and it is delicious with Chai Tea. Pretty much anything really..  If you have tried this and have an awesome recipe idea please share it with me because at this point I purchase this in bulk.  


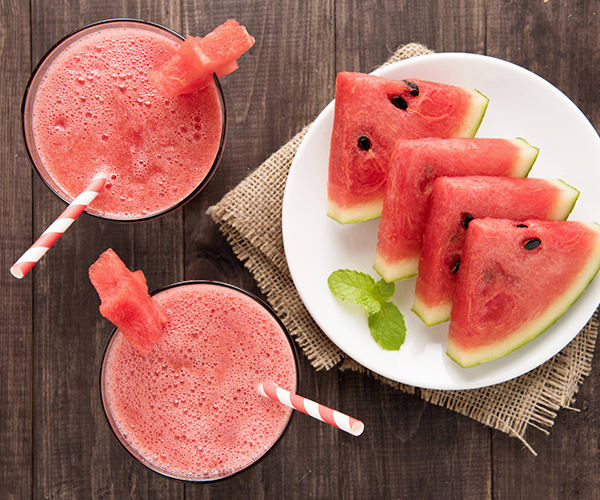
I mentioned Ice Cream Earlier so I wanted to give you guys my favorite FAVORITE recipe in the world !!  


This is the bees knees !!! It is so easy to make and so delicious. This is my goto recipe when I get in a sweet dessert mood. I pretty much always have bananas in the house and I don't eat them once they get brown spots on them.. So when they are more brown than yellow I just peel them and freeze them. 
I also freeze ice cube trays with almond milk which makes it really convenient for this recipe and my morning Shakeology.  I do not drink coffee but I think it would be pretty brilliant for Iced Coffee (I might be on to something) 

Ok back to the Ice Cream.  Here is a recipe from Beachbody.com that is pretty much spot on. This can be altered... basically you do not have to use Shakeology in this recipe at all if you don't want to, or if you do not have any.  Also you can leave out the Peanut butter if you're not in the mood.  So you will be left with Frozen Bananas and a milk of your choice :) Still yummy any which way you decide to make it.   


Prep time
Total time
Author: 
Recipe type: Dessert
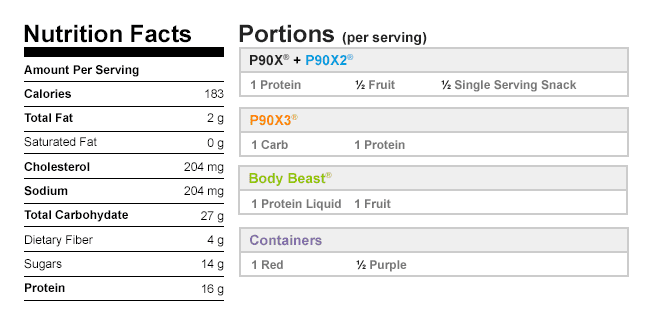
Serves: 5 servings, about ½ cup each
Ingredients
  • 1 cup any kind of milk (I prefer Vanilla Almond Milk, or Caramel Nutchello)
  • 2 scoops Shakeology
  • 2 medium frozen bananas (cut into chunks before freezing)
  • 2 Tbsp. all-natural smooth peanut butter
Instructions
  1. Place milk, Shakeology, bananas, and peanut butter in high-powered blender (such as a Vita-Mix); cover.
  2. Blend on low for 5 seconds; increase power to high and continue blending for 30 seconds until smooth.
  3. Pour mixture in a large glass bowl; cover.
  4. Freeze for 4 hours, stirring every 30 minutes, before serving.
If you do not want to wait 4 hours before eating this delicious treat I would suggest using frozen milk or adding Ice cubes to give it more substance. 
Enjoy :) 


Broccoli Tots


I recently posted some of my meal prepping on Facebook and the Broccoli Tots I made received the most attention so I figured I would share the recipe. 
These were so delicious. I changed them up a little because I did not add any cheese and used regular Gluten Free breadcrumbs instead of Panko but Oh my gosh they were yummy. 
My boyfriend is a Broccoli-aholic. He would be happy eating chicken, rice and broccoli for dinner every single day. Me on the other hand, not so much.  Its not that I don't like it, but it isn't in my top 10 favorite vegetables. 
I love Tater Tots however and with my food allergies it is impossible for me to find frozen/ pre-done ones and honestly I don't really want to make them from scratch.  
So when I saw this recipe online I was thinking that WHOA they combined one of my favorites with Pats .. match made in heaven? Actually yes ! As previously mentioned they were A-M-A-Z-I-N-G and super easy to make. 

To make these delicious Tots the broccoli has to be steamed or boiled. Once tender (and cool enough to touch) chop into small pieces and in a bowl mix with egg, breadcrumbs, seasonings, and cheese. I added some Hot Sauce and Chili powder to give it a kick. 

It helps to refrigerate the mixture briefly (15–30 minutes) to help it firm up and make the shaping process easier. To form your tots, use your hands to shape the mixture into a tot-like form. Then, place them on a baking sheet and bake until golden brown. Tip: make sure you use non-stick sheets or foil .. I didn't and it was a bit of a pain to flip them

Enjoy :) 


Prep time
Cook time
Total time
Author: 
Recipe type: Lunch/Dinner
Serves: 8 servings, 2 tots each
Ingredients
  • Nonstick cooking spray
  • Hot water
  • 12 oz. broccoli florets (about 5 cups)
  • 1 large egg, lightly beaten
  • ⅔ cup whole grain Panko bread crumbs
  • 2 cloves garlic, finely chopped
  • ¼ cup finely chopped green onions
  • ⅔ cup shredded cheddar cheese
  • ¼ tsp. sea salt (or Himalayan salt)
  • ¼ tsp. ground black pepper
  • 2 tsp. hot pepper sauce (optional)
Instructions
  1. Lightly coat a large baking sheet with spray. Set aside.
  2. Boil water in steamer or large saucepan over high heat. Reduce heat to medium-high. Place broccoli in steamer basket; cook for 3 to 4 minutes, or until tender-crisp and bright green. Drain and chop.
  3. Preheat oven to 400º F.
  4. Combine broccoli, egg, bread crumbs, garlic, green onions, cheese, salt, pepper, and hot sauce (if desired) in a large bowl; mix well.
  5. Refrigerate, covered, for 15 to 30 minutes.
  6. To make each tot, shape approximately 2 to 3 Tbsp. broccoli mixture into tot shape. Place on prepared baking sheet.
  7. Bake for 8 to 10 minutes. Turn over; bake for an additional 7 to 8 minutes, or until golden brown.


Chicken Cacciatore

There is nothing better than a wholesome meal ! This Dish is full of old Italian flavors and  combines lean chicken breast with eight different types of vegetables. 
My mom has always been an amazing cook and seasoning and flavoring is something she prides herself in. There has never been a time that I can remember that I needed to salt or season my food. This dish reminds me of my mom because it truly is full of flavor that will have you going back for seconds and thirds.  
I served this with steamed potatoes since I had some yellow containers left to eat <3 

Chicken Cacciatore

Total Time: 31 min.
Prep Time: 10 min.
Cooking Time: 21 min.
Yield: 4 servings
Ingredients:
1 Tbsp. olive oil
1 lb. raw chicken breasts, boneless, skinless, cut into 1-inch pieces
1 medium onion, thinly sliced
1 medium celery stalk, sliced
1 clove garlic, finely chopped
1 medium red bell pepper, cut into 1-inch pieces
8 oz. sliced mushrooms
1 (14.5 oz.) can whole tomatoes
1½ tsp. dried basil, crushed
Ground black pepper (to taste; optional)
2 medium zucchini, sliced
1 medium eggplant, peeled, cut into 1-inch cubes
6 fresh parsley sprigs, finely chopped (for garnish, optional)
Preparation:
1. Heat oil in large nonstick skillet over medium high heat.
2. Add chicken; cook, stirring frequently, for 3 to 4 minutes, or until lightly browned.
3. Add onion, celery, garlic, bell pepper, and mushrooms. Cook, stirring occasionally, for 4 to 5 minutes or until onion begins to soften.
4. Add tomatoes, basil, and pepper; cook, stirring occasionally, for 5 to 6 minutes.
5. Add zucchini and eggplant; cook, stirring occasionally, for 5 to 6 minutes, or until chicken is no longer pink in the middle, and juices run clear.
6. Garnish with parsley if desired.
Tip: Chicken Cacciatore can be served over brown rice or whole wheat pasta.
Calories in Chicken Cacciatore | BeachbodyBlog.com
Find more recipes like this on Beachbody.com

Cooking Terms for the Domestically Challenged

I was very fortunate enough to grow up in a home where I was forced to help my mom in the kitchen. I used to complain and huff and puff because at that point in my life (age 5-12) I had no idea how important cooking would be to my health and life. 
Having food allergies means that most of my food needs to be prepared by me and since I want it to taste good having knowledge of basic ingredients and cooking terms is pretty important. 

I do have a lot of friends that did not grow up in a cooking household. My boyfriend for instance is not a cook and neither is his mom. Her philosophy is that cooking and cleaning after a meal should not be twice as long as the meal itself. That does make sense but I enjoy cooking so much the eating part is only half the fun for me. Plus my boyfriend and I have an agreement that I do the cooking and he does the cleaning (Win !) 
So even if you do not cook often or well, its important to have a basic grasp of cooking terms so your hard work in the kitchen doesn’t go to waste. Not knowing the meaning of a word can lead to a lousy-tasting meal or an upset stomach.
Here’s our handy guide to some common — and sometimes confusing — cooking terms, so you can win at adult-ing.

IN THE OVEN

Bake — Cook in the oven at mid-temperature (usually between 300 and 375 degrees).
Roast — Cook in the oven at a higher temperature (usually 400 to 475 degrees) for a shorter amount of time. “This can also contribute browning, which adds to the flavor of the dish,” Caterson says.
Broil — Cook at a high temperature with your food close to the oven’s heat source. On bad-weather days, this can be a passable substitute for grilling; Caterson notes that broilers are basically “upside-down grills.”
ON THE STOVE
Sauté — Cook in a pan over medium-high heat, using minimal fat, while continuously stirring and flipping with a spatula. “As you get better, you can ditch the spatula and flip the food by just shaking the pan,” Caterson says. “You literally want to make the food ‘jump’ so it cooks quickly and evenly.”
Brown — Add food to a preheated pan and let it sit until it turns brown on one side, then flip it over. “This technique will add incredible flavor,” Caterson says.
Braise — After browning a piece of meat, add broth or water to the pan and simmer until the meat is tender. On a budget? This method is great for tough cuts of meat.

IN HOT WATER

Boil — Heat a liquid to its max temperature. You’ll see big, rolling bubbles and steam.
Parboil — Dunk food briefly in boiling water to cook it partially. (If you follow this up with a dunk in cold water to stop the cooking process, it’s called blanching.)
Simmer — Cook food just below its boiling point. Look for itty-bitty bubbles drifting up from the bottom.

CUT IT UP

Chop — Cut into rough, randomly-shaped pieces. No need for uniformity here.
Dice — Cut into small (1/4″ to 1/2″), square, uniform pieces.
Mince — Cut into the smallest pieces possible.
Slice — Cut into lengthwise strips. (On that note, julienne means to slice veggies into uniform matchstick shapes; chiffonade means to slice herbs like basil into ragged strips.)
Shred — Cut into short, narrow strips using the bigger holes in a box grater.
Grate — Cut into tiny, powdery pieces using the smaller holes on a box grater.

MIX IT UP
Blend —Stir ingredients until they’re evenly combined.
Beat — A more vigorous stir, usually with a whisk or electric mixer, until the mixture is smooth. This introduces air, which can affect the texture of baked goods, so don’t take shortcuts with an electric mixer if the recipe says to blend by hand.
Fold in — Use a spoon or rubber spatula to slowly add a light ingredient or mixture (like powdered sugar or whipped cream) into a heavier mixture (like batter) by gently scooping the heavier batter over the lighter mixture until it’s absorbed. This keeps air bubbles from sneaking into the mix.
Whip — Blend at high speed to get air into the mixture, like you would when making whipped cream or meringue.

THE SMALL STUFF
Dash — A quick shake of your spice jar.
Pinch — Literally whatever fits between your thumb and forefinger. “Reach in your salt or spice container and pick up a pinch,” Caterson says.
Dollop — A spoonful. Big spoon or small spoon? Depends on how much you like the ingredient.
Find more recipes like this on Beachbody.com
Following recipes on your phone, tablet, or laptop in the kitchen is great, but watching someone create Beachbody-approved recipes can be even more helpful to budding home cooks. Now, with FIXATE, only on Beachbody On Demand, you don’t have to be a master chef to add flare and elegance to your healthy eating plan. Autumn Calabrese and her brother, international chef Bobby Calabrese, show you exactly how to create tempting and delicious meals that can still help you lose weight. You’ll get access to the detailed recipes and grocery lists, and get new recipes each week!

Going Allergen Free


Something that has been on my mind lately is how difficult it is to adjust to a special diet. 

I have struggled with my diet since I was 11 or 12 years old, never truly knowing what was making me sick. Doctors never figured it out and essentially I learned by trial and error what my body did and did not tolerate. 

So my list of things that I cannot eat are : 

Gluten : Wheat, Barley, Rye.
Dairy: Pretty much everything that has Casein and Whey which are proteins in milk
Corn: Which is in EVERYTHING and it has fun names like Dextrose (found in iodized salt?!?) and Maltodextrin (found in most Deli Meats) 

You're probably thinking -How on earth did you figure all this out? Well it certainly took over 15 years, a lot of journaling, frustration and several meltdowns inside grocery stores. 

I recently had a few people reach out to me who have been told by doctors to adjust their diets and stay away from Gluten and I remembered how hard it was to change my diet at first and how much I struggled. There is so much to learn, not just about what gluten is but also how to monitor ingredients. 

I am by no means an expert, but I can tell you my story and what I went through learning to live with a limited diet in hopes that I can help you.  

Lets just start with what Gluten is 

Gluten is a general name for the proteins found in wheat (wheatberries, durum, emmer, semolina, spelt, farina, farro, graham, KAMUT® khorasan wheat and einkorn), rye, barley and triticale – a cross between wheat and rye. Gluten helps foods maintain their shape, acting as a glue that holds food together.  (source: https://celiac.org/)

It is prey much all the good things in life- BREAD, PIZZA, SPAGHETTI, DONUTS and one of my all time favorite, ENGLISH MUFFINS.  If it is made with flour chances are it is gluten. 

Not being able to have Dairy for me was not so difficult. Soy milk was getting popular when I was younger which I thought was quite delicious and honestly I was a huge fan of sorbet rather than Ice-cream.  Cheese was a bummer but I was still eating Pizza minus the cheese but twice the pepperoni so not all was lost.  

When I had a friend suggest I go gluten free is when I had my first meltdown. I feel so bad for the boy that worked at the health food store I visited for my first ever gluten free shopping trip. Basically I started hysterically sobbing and crying in the baking isle with this boy trying to figure out what was wrong with me. I most likely scarred the poor kid for life.
Honestly I had no reason to be in that isle because I do not bake but I googled "going gluten free" and printed out a list and just went with it. 

That was so not the right thing to do !  
I went to the store with a list of things I have never heard of and some I did not even know how to pronounce... I was particularly upset over Sorghum flour (WTH is that?? I have never used it EVER) and also Xantham Gum (Seriously??? ) 


Ok the point I am making is that it is difficult at first but really not that complicated. 
I am pretty sure adjusting a diet has stages just like grief that go something like this 

Shock & Denial-  Those are the first emotions you feel when you find out you can no longer eat something you enjoy and you think NO WAY!! Im sure the doctor is wrong. 
Anger & Retaliation- This is crap and Gluten Free/Allergy specific foods probably taste like poo. I don't even know where to start. This sucks. You're probably gonna try to eat it anyways and regret it afterwards. 

Fear & Depression- What will I eat? Will I ever fit in? How will I deal at Restaurants, going out and holiday parties? You look at your pantry and panic.  My thoughts were- going to be awful and I'm just going to stay home forever and starve. 
Relief & Acceptance-  You knew something was wrong and the last thing you want to be is  sick and you're eventually gonna be hungry and want to leave the house and be a functioning human being.  

It’s overwhelming going gluten-free/allergy-free at first. The couple months are the hardest and then it gets easier.  You're gonna learn why it's good to ditch food thats not good for you, paying attention to how foods make you feel, and adjusting your diet accordingly.  Once you cut out whatever it is you can't tolerate, you will wonder why it took you so long because you feel AMAZING
So here are some tips to not go crazy: 
1. Quit Cold Turkey - Figure out what in your house contains your allergen, take it all out and write it all down so you can catalog it so you can replace it with things you can eat. 
2. Find Substitutions- So lets say Gluten is what you're replacing:  
  • Pasta- Corn, Brown rice, Quinoa and Black Bean Pasta is available. 
  • Bread- TONS of GF options are out there. 
  • Flour-Even more options available depending on what you're doing.. Remember that Sorghum I mentioned earlier? Yeah thats one of them.. but there is almond, potato, corn, coconut, tapioca.. all sorts of stuff. 
  • Pizza- Yep, gf, soy free, dairy free vegan pizza is available. 
  • Cake and Cookies- You beta. 
  • Here is a website with more Substitutions
        Sounding better right ???  


3. Meal Planning- This is one of the reasons I am such a fan of Beachbodys Portion Control containers and meal prepping. It makes it easy to have a clear vision of what you're going to be making through the week and help prepare you. Lets say you have Taco Tuesdays, well chances are the taco seasoning you were using is not gluten free and flour tortillas are out. Well being able to plan ahead will make things easier. Making taco seasoning from scratch is better for you and delicious and you can use either corn tortillas or in my case lettuce wraps.
I have come to the point in my life where I can make anything to meet my dietary restrictions but I need a plan and I spend a day prepping my meals so all I need to do is plate my meals and heat them up.  
4. Grocery Shopping- So here is the most difficult part, the time it will take you to grocery shop will increase. My boyfriend jokes that I could live at Publix (it is a pretty amazing grocery store) but the reason is because I read labels and ingredients for EVERYTHING. I mean I have to look for a lot of ingredients, dairy, wheat, barley, dextrose, corn starch, maise flour, maltodextrin.... that is a lot of reading !!  A couple of things to look for depending on your sensitivities. Some of you may be so sensitive that contact with or cross-contamination with gluten/ allergens can be an issue, so when you are buying deli meat or anything that the store prepares make sure they wipe down the equipment. Also on labels it will tell you if a food is prepared in a factory where there are other items processed that contain allergens. 
5. Eating Out- I am so thankful that Gluten free has become a trend because there are so many options available. Not every server will be knowledgeable about gluten/allergens so make sure you let them know you have an allergy and that they inform the chef.                                                                          
Here is an amazing resource for allergy free restaurants !!!
5. Google & Pinterest - Google can be your best friend. I can't even tell you how many times I have googled, "Is there gluten in _____?" "Is there corn in______?" and Pinterest is amazing for finding recipes and blogs that are devoted to allergy free recipes and cooking tips !!

This stuff is confusing and when you are just starting out...it kinda feels like... well what the hell CAN I eat???
But over time, you will be a pro (I promise, If I can do it so can you). 

You have an advantage...gluten free/allergen information and options are becoming more available and part of every day living.
I promise if you keep it simple, keep reading and learning, and continue to have an open mind, you can become completely Gluten/Allergen Free without going crazy.


Tropical Watermelon Shakeology

There is nothing that screams summer more than Watermelon in my opinion. Its delicious, thirst quenching and pink !! I used to not really like Watermelon and I am not sure what clicked, but one day I woke up and thought it was great !! 


I especially like this Tropical Watermelon Shakeology recipe that blends watermelon with Tropical Strawberry Shakeology. It’s light and refreshing, and the flavor of the watermelon really shines. For an even more refreshing flavor, I finish it off with some mint leaves. 

Freshly cut watermelon is perfect for smoothies, but I also like to freeze leftover watermelon and use the frozen chunks in place of ice cubes in my smoothies. When the end of the season approaches, I stock up on melons to cut and freeze, so I can continue to enjoy the flavor of summer during the winter.


Prep time
Total time
Author: 
Serves: 1 smoothie
Ingredients
  • 1 cup water
  • 1 scoop Tropical Strawberry Shakeology
  • ½ cup cubed watermelon
  • 1 cup ice
Instructions
  1. Place water, Shakeology, watermelon, and ice in blender; cover. Blend until smooth.

Tropical Watermelon Splash Shakeology Recipe
IFind more recipes like this on Beachbody.com

Follow @ Instagram

Back to Top